Friday, December 30, 2011

The Sweet Good-Bye

The first cake I decorated happened circa 1986. It was my mothers birthday and I was the only girl in a family of six. I knew if anyone was going to be baking for mom it would have to be me and I loved to be in the kitchen. I think there is a photo somewhere in my closet of that sloppy little 9 inch round with chocolate chips pressed into the icing on the sides of the cake and one lone hershey's kiss in the top center. Flash forward a little more than a decade and I'm a newlywed trying my hand at legit cake decorating for the very first time, somewhere circa 1998. I'm thankful no pictures were taken of that epic fail. Still more time passed and in 2000, while living in Oklahoma City, I read about a newcomer on the cake decorating scene who brought so much inspiration into my world I could hardly stand it. Ruth Rickey was getting a lot of attention for her amazingly detailed cakes and I clipped many articles from the newspaper in awe of the skill she used to crank out delectable creations in her bakery, "Ruth's Sweete Justice". This article stays pressed in the pages of the very first cake decorating book I purchased. 
I read about Ruth, attorney turned cake designer, and her work with fondant when I was still a buttercream only girl (we all have to grow up sometime though and I knew fondant was in my future). She was my first true inspiration. The following year Ruth's diagnosis with leukemia coincided with my father's death from leukemia and once again she had my attention. She went on to win her battle with the disease and dedicates much of her time raising money for and bringing awareness to the Leukemia Society. Ruth Rickey truly is my hero. 

I continued to follow her career as I moved to Michigan and then on to Texas, watching her compete on the Food Network and WE TV, and when I read that Ruth had decided it was time to close up shop after 11 years of business (no worries she's on to bigger and better things - there is no slowing down for this lady), I found myself acknowledging the end of an era with a tear in my eye. Oklahoma City will never be the same. I will never be the same. Her last day of business was Christmas Eve. Ruth is selling her many tools of the trade in her OKC bakery and as I prepare to make a few purchases from her next week I remain uncertain whether or not I'll actually use them...I simply want a little tangible something of her. Ruth, you were my first great inspiration, you were the butter-in-my-batter and I will never be the same.

Photo Friday #7 - Where's the Beef?


Friday, December 23, 2011

No Skinny Genes Were Harmed in the Creation of this Post


...because clearly I was not handed skinny genes (or jeans) in the creation of my persona. No worries there. These lemon blossoms go down easy - EASY I tell you - and before you I know it, I've polished off a half-dozen and find myself licking the icing spoon. Holy Moses. Someone save me from myself. I'm really not to blame for my waning self control. I did not come to know these lemon blossoms of my own volition. I first made the acquaintance of this charming recipe at the hand of my equally charming oldest child when he solicited the formula from a sweet friend at church. I believe she found the original recipe from Paula Deen, but as these things sometimes go, ingredients are tweaked and quantities adjusted and voila - a whole new recipe is born. Much like the childhood game of gossip where the end result is nothing like the original, recipes often take twists and turns until they reach a new identity all their own. I'm not sure these blossoms have evolved to that extent just yet, but I'm happy to share this version of them with you in hopes that you and your hips lips find equal satisfaction from their goodness. 


Lemon Blossoms

1 package yellow cake mix
3 1/2 oz. package instant lemon pudding mix
4 large eggs
1 cup vegetable oil

Icing:
4 cups confectioners sugar
1/3 cup fresh lemon juice
1 lemon, zested
3 Tbs. vegetable oil
3 Tbs. water

Preheat the oven to 350 degrees. Spray miniature muffin tins with vegetable oil cooking spray. Combine the cake mix, pudding mix, eggs and oil in an electric mixer and blend well until smooth. Scoop a small amount of batter into each tin, filling about half way. Bake for 12 minutes. Turn out onto a tea towel.

To make glaze, sift the sugar into a mixing bowl. Add the lemon juice, zest, oil and water. Mix well until smooth. 

With your fingers, dip the cupcakes into the glaze while they are still warm, covering as much of the cake as possible. Turn them upright and place on wire racks with waxed paper underneath to catch any drips. Let the glaze set thoroughly, about 1 hour, before storing in airtight containers.

Photo Friday #6 - Merry Christmas!!


Tuesday, December 20, 2011

Biscotti Bliss

 
It's the most wonderful time of the year! Having finally wrapped up many holiday work commitments (so many exciting things happening that I can't wait to share - more on that in a later post), we are now busy whipping up holiday treats and edible gifts for friends and neighbors. This is truly my favorite kind of "work"! These biscotti have been flying off the sheet pans this year, tied up with string in cute little bags and handed out by the dozen. Biscotti actually means, "twice baked" so we're breaking a key rule with this recipe as I only bake it once allowing for a slightly softer crumb. The almond extract is absolutely necessary for the end result. Great alone or with a cup of coffee, we've been gifting them alongside flavored coffees from my gourmet coffee line. I hope you will enjoy them as much as we have - so simple to make and utterly delicious, they are addictive! Happy Holidays to you and yours!

Basic Biscotti

2 stick of unsalted butter
2 cups of sugar
3 eggs
4 cups of all-purpose flour
1 1/2 tsp. baking powder
2 oz. toasted almonds (1 oz. in the batter, 1 oz. to be sprinkled on top)
1 1/2 tsp. almond extract
small amount of milk for brushing

Cream together butter, sugar, eggs, and almond extract until well combined. Sift together flour, baking powder and stir into egg mixture until well combined. Stir in 1 oz. of the toasted almonds. Turn dough out onto a floured surface and roll into a log. Divide into 3 equal portions. Roll each portion into another log and pat down slightly. Place each on a greased sheet pan and brush with milk, then sprinkle with remaining toasted almonds. Bake at 350 until lightly golden brown on top. Cool completely and then cut on the bias. Happy Baking!

Thursday, December 8, 2011

Banana Nutiness


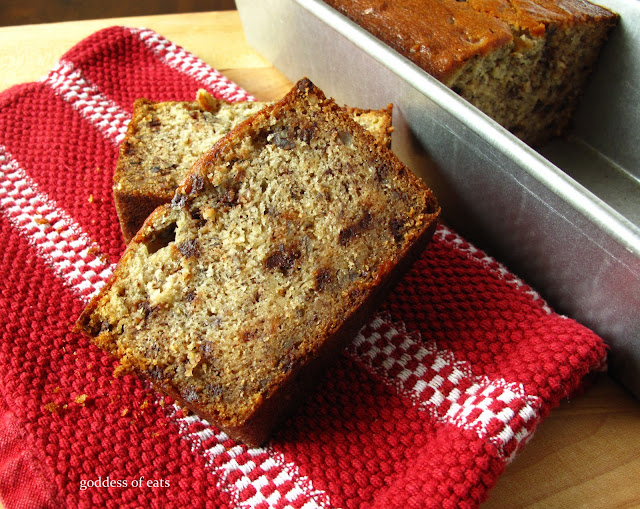
We all need a few standard go-to recipes, preferrably in a worn out binder covered in food stains - stains that are known around here as "casualties of chaos" in staggering proportions. Yet, we march on down the beaten path with familiar friends from time to time and this recipe is one of my favorite pals. Basic banana nut bread. Love every morsel of it. We (my two oldest offspring and I) stirred in about 3/4 cup chocolate chips to make things interesting...we have a hard time leaving basic alone and letting it do its work. We were pretty pleased with the warm little bites of chocolate - maybe next time we'll add dates or apricots, but either way our basic banana goodness leaves a curious soul with lots of opportunity - Happy Experimenting!


Banana Nut Bread

1 stick unsalted butter at room temperature
1 cup sugar
2 large eggs
1 1/2 cups all-purpose flour
1 tsp. baking soda
1 tsp. salt
2-3 very ripe bananas, mashed
1/2 cup sour cream
1/2 cup chopped pecans
3/4 cup chocolate chips (optional)

Preheat oven to 350 degrees. Butter a 9x5 loaf pan; set aside. In a large bowl, cream butter and sugar until light and fluffy. Add eggs and mix until blended. In a medium bowl, stir together flour, baking soda and salt. Add to the butter mixture and stir until just combined. Add bananas, sour cream, and vanilla. Stir in nuts and chocolate chips and then pour into prepared pan. Bake until a toothpick inserted in the center comes out clean, about 1 hour. Let rest in pan for 10 minutes, if you can stand to wait that long before slather up a hot slice with a pat of butter - delish!